Elusive Path Pep Rally o'Doom Guide
Table of Contents
1. Purpose
The purpose of this document is to provide a framework for pep rally leaders and participants to follow for successful pep rallies. Preparation
Pep Rallies are not meant to get your character up to level 65 nor to give you the latest 100k plat item. They are meant to defeat creatures that cannot be defeated by single groups. If you want experience and loot do LDON adventures. Pep Rallies exist to have fun in a setting with your guild mates and this should be made clear to all who plan to attend our pep rallies. With up to 72 people, the odds of good loot and good experience are slim so it is completely about the fun, the company, and seeing sights that you couldn’t see by yourself.
Preparation
In order for us to
run successful and fun pep rallies we will be posting pep rallies on our message boards many
days, if not weeks, in advance. These posts will contain quite a lot of important
information such as:
We recommend that you check the forum regularly for these posts.
If you plan to attend a pep rally it is your responsibility to be fully prepared, provisioned (arrows, food, water, spell components, resist gear, etc, etc), in the channel, and at the gathering point at least 30 minutes before start time. Please have anon and role-play off at this point so the pep rally leader can get your level and class to form groups.
If you join the channel and/or show up right at the start time you need to understand that it’s very inconsiderate to everyone else involved. Your time is no more important than anyone else’s and by you not joining the channel and showing up late you have inconvenienced everyone in the pep rally.
A suggestion that will make things go very smoothly is for you to camp the character you are bringing to the pep rally close to the hunting grounds some time before the hunt (also known as staging). Don’t assume that you can log in and someone will come pick you up. You must always be prepared to have to run or pay for a port to get yourself to where we are pep rallying. Our druids and wizards are very helpful individuals, but if they are already at the pep rally after doing pickups it’s stressful and annoying to have to port out for latecomers. If you show up 15 minutes before start time you will more than likely have to run to where ever we are pep rallying.
That is not to say do not come at all if you're late. We want everyone to join us and have fun. However, if you are on and you know there is an upcoming pep rally it is your responsibility to do everything possible to make things go smoothly. Joining the channel and getting yourself to the appointed gathering spot on time is your responsibility, not ours.
If you show up late and we have already commenced our spelunking expedition we may not be able to get you down to us without inconveniencing or endangering everyone else. Please be patient and know that we will get you if we can because we really do want everyone to come hunt with us. The thing to remember is that a pep rally is about the common good and not individual needs.
We will try to supply a run time for the pep rally. This is how long we expect the main pep rally to run. If you cannot commit to the time, and you cannot gate out of where ever we are at, please do not expect someone else to port you out. With the use of xloc this is not as much of a problem as it used to be but you still need to be conscious of the fact.
There will also be the occasion where we stumble across a specific mob and need to move fast. There are many other guilds on our server and many of the mobs will be contested frequently. The basic rule of thumb is First in Force, but we can generally work with most other guilds to find a compromise. However, if you’re not doing your best to increase mobilization speed, you’re letting the rest of us down.
Delegation
Proper
delegation is the key to an effective pep rally. A pep rally leader is jumping rope while
trying to juggle chainsaws so the delegation of key positions within the pep rally
is
absolutely required.
Communication
Use the message
boards for any suggestions or ideas for our pep rally. Backseat driving or
second-guessing the person leading the pep rally while the pep rally is in progress is a
guaranteed morale killer. Whoever is leading the pep rally is on fire, juggling
chainsaws, and skipping rope all at the same time already. If you have
questions, your point of contact is your group leader. This goes for the
puller/pull team in the pep rally as well. Leave them alone. They are already hanging
their butt's out of the boat and chumming for sharks.
Group leaders are responsible for communicating with the pep rally leader. This is a two-way communication. The pep rally leader MUST let the group leaders and the pep rally know what they should be doing at all times or you risk a loss of morale. If it is to hold for a few minutes till the way is clear, then hold. If its get out the can opener and open the whoop ass can, then, by all means, whoop ass. We all know that nothing is worse than standing there waiting for some sort of direction as everyone in your group is asking you what's going on. This is probably the pep rally and the group leaders biggest responsibility. The group leader must relay what's going on to his group members and everyone needs to know what he or she is doing. Once they know that, then they can relax and do their jobs.
Communicate. Communicate. Communicate. If you’re going AFK you must make sure that you inform your entire group. Another key if you're going AFK is to engage auto-follow on a caster preferably. If someone goes LD make sure it is announced so that everyone knows and we can plan accordingly.
Another part of communication is listening, or reading in the case of this game. Every person that has led a group someplace, or tried leading a pep rally, can tell you that many of the problems in a pep rally are the direct result of someone not listening or not paying attention. The pep rally leader may be shouting, “HOLD!!! HOLD!!! HOLD!!!” but there they are, 2 or 3 people still running blindly ahead like little bunnies through a meadow.
Many times during a fight we may need to move the mob backwards, forwards, get it out of the wall, or possibly switch targets. We should not have to say, "Back up" 5 times before you finally notice people actually mean you.
Always, always, always keep an eye on your chat area for pertinent information because, while you might be trying to make a funny joke, the rest of the pep rally is camping to clear aggro.
Movement
Don't wander. Let me
repeat that. Don't wander. The only people who should be moving away from
your pep rally are the pep rally leader or the puller/pull team. If you wander, a couple
of things will more than likely happen:
Avoid the above scenarios: Don't wander.
If you lose sight of the group/pep rally you are following, immediately let your group know and stay put. We should not be running for 30 seconds and only find out you are lost after we all arrive at our destination. Pay attention and let us know so we can deal with it. We will either pick you up immediately or ask that you die with some dignity and we will get you rezzed in camp.
If you're going someplace that you have never been before, either print a map or go take a peek at one on-line. If you have a general idea of how things are laid out you might just have an ace up your sleeve. Also, if you DO know your way around, do not assume that everyone that is following you can move as smoothly or as fast as you. Nothing is more annoying than to have someone say follow me and before you even get turned around they are gone. Many people have slower connections, slower computers, or are just not as comfortable as you are in a place so take the time to make sure they are with you.
If your entire group is moving to a spot and you are leading them you need to make sure you have the whole group. It’s your responsibility as the person those folks are following to make sure they are with you. If you’re leading them someplace do NOT run straight there and then look around and see if your group is with you. You must take the time to make sure you group is moving with you at all times.
Beginning the Pep Rally
As a pep rally
begins, the leader should announce the following to those attending:
When using the Pep Rally feature in game, it is easiest to invite your group leaders to your pep rally and then have them invite their members. This avoids the ‘A member of the group you are trying to invite is out of range’ bug.
Buff as needed and med fully when possible during formation. AE buffs will be announced and coordinated so please pay attention. Please keep unnecessary chatter from the main pep rally channel at this time. We are trying to dot all the I’s, cross all the T’s and get our ducks in a row at this point. Please be patient and understand that there are many other variables in play that don’t hinge on if you personally are ready or not.
Sudden Death
The best pep rallies can sometimes end up in a wipeout where
every member is killed deep in the middle of a horrible dungeon. Suck it up and
die if you have to. Yes, it sucks, but do it anyhow.
If you’re the puller and you know that something very bad has just happened, find a comfortable spot and die with some dignity and a /loc. Don't wipe out the entire pep rally because somehow, someway, you just aggroed the entire zone.
Monks and all other with FD, if the excrement starts hitting the rotary oscillator and it looks like you soon will be having a total party wipeout, FD. You may be the difference between a 20-minute corpse recovery and a 3-hour one. You can be the eyes and the ears of the party, and/or pep rally and that in itself is very, very important.
In some cases we may have group’s evac their members out should a disaster strike. We will make it clear to every group and to the evacers for those groups if they must be prepared for this contingency. The pep rally leader is in charge of yelling EVAC!, but group leaders need to inform the pep rally leader if their group is in serious trouble.
Sometimes death is a better alternative to escape. Pep Rallies are sometimes brought back online easier if they are simply rezzed where they lie. We will make sure this is clear if this is the case.
Please be patient, understanding, and avoid any and all finger pointing when wipes or mistakes happen. We are all guild mates and each of us could relate a story of where we caused an incident such as this. Bad things will happen from time to time but if we stay upbeat the entire process will go much smoother.
This also is not a good time to say, “Well, I have to go now”.
You’re on a pep rally with your guild and they are counting on you to be there for them. If we are in a situation where we can let people leave at will, we will announce it. If we can’t, sit back and relax.
Ending the Pep Rally
Invariably
groups stand around and discuss where they are going and who wants to end up
where. Meanwhile big mobs start respawning and killing those who didn't leave on
time. The pep rally leader will direct everyone to port to a predetermined
destination, and have them worry about where everyone wants to go from there.
The pep rally leader, and their group will be last group to leave so if there is any
crisis they can take care of it personally. If we have a wizard along with
appropriate skills we will AE xloc the entire pep rally out.
Make sure to plan to evac to a zone friendly to all participants. Nexus or PoK is recommended.
Group Leader (GL):
Group composition and Group Leaders are selected by the Pep Rally Leader. The
primary responsibility of the group leader is the management and conduct of
the group members. They are also the liaison between individual groups and
the RL.
During a pep rally, this person will loot any and all rare drop items and distribute those at the end of the pep rally. Looting is a big part of any pep rally, and normally the master looter will not participate in fights unless absolutely necessary, in order to keep up with the corpses.
In the case a class-specific item is dropped and no one in the pep rally can use it the master looter will loot it for the guild bank or they may /ooc to the zone that the item is available for loot.
Puller/Pull Team:
The pullers are solely responsible for pulling mobs. At no time should any
other participant of the pep rally attempt to pull. The puller also must be
familiar with the pathing of mobs. The puller is usually the highest-level
monk, ranger or shadow knight on the pep rally, but other classes may also fill
this role. The puller is responsible for pulling out rooms in the dungeon,
splitting the spawns, and bringing them back one or two at a time for the pep rally
party to destroy. Pulling is an art, and it is very difficult to pull a
high level dungeon properly. Pullers will sometimes double as main assists,
but not usually. Not every pep rally will involve pulling, as many dungeons are
built to discourage it.
Secondary Assist: The SA or Secondary Assist is responsible for taking over the duties of the MA in the event of the Main Assist's death. The SA may also be required to handle any non-mezzable or add (in LoM situations) mobs. A hot key should be made to assist the also SA before the pep rally. The SA should setup communications with the enchanters or bards prior to pep rally initiation for instances of more than one add. The SA should also setup a hotkey designating that they are off-tanking a mob for pep rally communication. Example:
/rs OFF-TANKING %t assist the MA!!!!
Crowd Control:
This position may fall to multiple enchanters and/or bards. It is their
responsibility to target any aggressive mobs that are attacking the group
before the group is ready to handle them. They are responsible for adds
unless LoM (see MA/SA responsibility). If LoM then the Enchanter or Bard
should announce the percentage to the pep rally channel. Root and pet classes can
hold a mob from entering the main fray as well. If you root a mob please
announce that said mob is rooted and others should back away.
The Hate List and You
When our guild attacks a mob, every person who is
actively helping the effort (this includes damage dealers, healers, and giving
buffs to players who are doing damage or healing) gets a place on a mob’s hate
list. The hate list, in short, is how the mob determines whom it is going to
attack. Remember, in most cases (except rampage) a mob will only be attacking
one person with its melee attack (though others may get hit by an Area of Effect
spell [AE] if the mob is capable of AEing).
As a general rule, you want one person to be taking all the damage from the mob. The reason is simple: if one person gets aggro and starts being hit, and then the aggro shifts and another person gets hit, and then it shifts again and another person starts getting hit, that’s three different people that your Clerics have to keep alive. If only one person is taking all the damage, all your Clerics can focus on that one person, known as the MA (MA stands for Main Assist—meaning that everyone should be assisting him in attacking the mob). The MA is usually a warrior, though in different situations different MAs may be needed.
The person at the top of the mob’s hate list will be the person the mob attacks. Our goal is to keep the MA at the top of the hate list…if we do so, the mob will stay on him and won’t be beating up on the rest of our pep rally force. To keep the MA at the top of the hate list, he must constantly be building hate (hate is also known as “aggro” or “taunt”). Unfortunately, everyone else who is in any way assisting with the kill will also be building hate. If you create more hate than the MA then the mob will turn to you, this is known as ‘pulling aggro’.
A number of different activities build hate, including damage, taunting, procs, spells, heals, buffing, proximity, and faction. Damage is pretty clear-cut. If you go up to Vindi and hit him for 100 damage, you will have built 100 points of hate. The more damage you do to a mob, the higher on the mob’s hate list you move. If you swing again and hit for 60, you now have 160 points of aggro. On the other hand, if a mob does 200 damage to the MA and a Cleric heals him, the Cleric will get 200 points of hate; the mob interprets it as if the Cleric had just done 200 points of damage. In this scenario, the Cleric would be at the top of the hate list and would likely die very fast. The MA must always be at the top of a mob’s hate list. Always.
Aggro Management
So, it is important for the mob to ONLY attack the MA.
How do you make sure the mob is busy attacking the MA and not eviscerating your
Clerics (or anyone else for that matter)? It’s called Aggro Management, and
it’s one of the most crucial things to understand. Without good Aggro
Management on the part of the MA, SA (Secondary Assist—the person who becomes
MA if the MA dies), and TA (third assist, becomes MA if MA and SA die), the
entire pep rally is doomed.
Without good aggro management on your part, you will most likely die, and could possibly take some of your guild with you (especially if you cause a mob to start ping-ponging or cause a key person to die).
More will be covered in the positioning section, but ideally your target should remain relatively still and should always be facing the MA. If the MA loses aggro the mob will begin ping-ponging—he will turn and attack whoever has the most aggro and once that person is dead will go on to the next person with the most aggro, etc. When a mob starts to ping-pong it’s usually a pretty good sign that the pep rally is falling apart, and unless the MA, SA, or TA has the Alternate Advancement ability of AE Taunt, most likely the pep rally is doomed. AE Taunt will put the warrior who uses it at the very top of the mob’s hate list (and the hate list of any other mobs within the radius of effect). It is very useful in a number of fights.
Our MA will be trying to control aggro by using the taunt skill, incite, by bashing or slamming, and by standing as close as possible while attacking. With some mobs the closest person will always be on the top of the hate list. This is known as proximity aggro and is true for all mobs that are rooted, most mobs that are on a leash, and some undead mobs. The MA or SA should only use taunt if they lose aggro. The purpose of taunt is to increase your aggro to ONE point above the highest person on the hate list. Repeated taunting does nothing other than increasing the chance that taunt will not be active when it is most needed. TIME YOUR TAUNTS
The MA should stand as close as possible to the mob and use good high-aggro, fast weapons. Many weapons have “procs” which do additional damage or have an additional effect. One of the best taunt weapons is the Blade of Carnage (or the Hatebringer/Bloodfrenzy from Luclin) which procs a spell that causes the wielder to get 500 more aggro (it’s the exact opposite of the Ranger’s Jolting Blades spell that lowers aggro). If we cannot yet kill the Avatar of War, we may want to try to get Willsappers or Sword of the Bloodsworn for our warriors. The Willsapper drops off a particularly nasty rat in the Dragon Necropolis by the name of Vaniki. It procs a 35% slow—and slow spells are great for increasing agro. The Sword of the Bloodsworn drops in Droga off the Earth Seer Gamlik and procs a Stun + DD that lands on lvl 65 mobs. Other procs include DD procs, DoT procs, AoE procs, and DD + DoT procs, DD + debuff procs and DD + DoT + debuff procs. As a general rule, any proc with a stun associated with it is going to be extremely high agro (usually about 300 to 400 hate), followed by Debuff / Slow, DD + DoT, DD, then DoT. We don’t advise using weapons with AE procs since that can get you in a lot of trouble (the AE may well aggro something else that is standing nearby, especially if it is mezzed or rooted).
As a general rule, a straight DoT is fairly low initial agro. A DD + DoT spell is very high agro, and a debuff (especially a DD + debuff or a DoT + debuff) are extremely high agro. Slows and heals are also high aggro. DDs are also high agro. Never, ever, sit during a major encounter. If you are in a group, wait at least five seconds before you sit down if you have just cast a nuke (nuke is another word for a DD spell). If you know the spell you used is high aggro, wait until the mob is dead before you sit. Mana regen is nice, but it isn’t worth dying for.
If you can jolt, evade, or FD, do so periodically during the fight in order to reduce your aggro. In straight melee combat, a rogue will do something like 1.4 times the damage of a warrior and a ranger will do something like 1.15 times the damage of a warrior. That means you may build hate faster (depending on your weapons and your MA’s weapons). If you aren’t a ranger or rogue, you may simply have to turn attack off if you start to get too much aggro.
Always attack from max melee range (this means the furthest you can be from the target and still hit it) unless you are the MA—attacking from as far away as you possibly can will create less aggro and allow us to balance the mob better than standing right next to the mob with auto attack on.
Never taunt unless you are the MA or you are trying to pull the mob off a caster.
Monks, SKs, and Necros, remember that you can FD and remove yourself from the mob’s hate list for as long as you are down. When you get up again you will still be on the hate list, but by that time your hate will have decayed and the MA’s hate will have increased. Also remember that by removing yourself from the mob’s hate list (i.e. using /q or feigning death before the mob dies) you can possibly save yourself from any faction hit that killing that mob might normally cause. This comes in very handy at times.
Remember that by getting aggro when you shouldn’t have it, you are seriously harming our chance of success. Dying hurts our guild more than it hurts you. A death to you is generally no more than a fraction of a blue of XP and a little bit of down time (assuming someone can rez you). However, for the pep rally it means rezzing you, then rebuffing you, and more important, it means losing a valuable member at an important time in the fight.
Main
Assist Tactics
The
idea of MAT is that only one tank will need to be completely healed.
The Main Assist (declared by Pep Rally Leader based on AC, weapons, level) should be the only person to taunt and build aggro before all other engage the mob. This includes shooting arrows and casting debuffs unless otherwise directed by the RL. All other Melees attack the mob at the maximum attack range.
Every member of the pep rally should set up an assist key prior to the event. An assist key allows you to easily make the MA’s target become your target. With the exception of crowd control and healing this is the only way you should be targeting a mob at any time.
/assist (MA)
You must be aware that there will be times when the MA will be switching from mob to mob on multi-pulls to make sure the rest of the pep rally is not flattened. If you hit your assist button before the MA calls for you to assist it is very likely that you will be hitting the wrong mob. The only way to be sure you are on the correct mob is to wait for the MA to make his ‘Assist me now’ call and THEN hit the assist button.
Once the MA has made this call and you are engaged with a mob do NOT hit this button again unless the MA calls for you to switch to another mob. If he does call switch then simply hit your assist button again and move to the new mob.
The MA should set up several hotkeys prior to the event. The first announces whom the MA is attacking:
/assist
(puller)
/rs
ENGAGING %t, please allow me to build agro
This if followed by a command to assist once enough aggro has been established:
/rs ASSIST with %t now!
The MA will also decide if another mob in camp deserves a higher priority and that we should switch to this mob. At this point the MA should use the following:
/rs SWITCH!!! SWITCH!!! Assist with %t now!
The MA will also be the one to decide what mezzed mob to attack next, and should use the following:
/rs Breaking MEZ on %t now, wait for call to assist plz!
Then, after aggro is built, the MA will use the assist hotkey. If the MA is close to dying and no CH or celestial has been called the MA may make two additional hotkeys. For example, the MA might make a hotkey like this one for a 55+ warrior:
Hotkey name (up to you any you like)
/discipline
defensive
/pause
600*
/pause
520*
/tell
(SA) my def gone in 5 sec, move up taunt and open defensive plz!!
/rs my
def gone, change your target to (SA) for CH plz!!
Note: *10 = 1 sec
Or a simpler version:
/tell (SA), move up and taunt
please!!
/rs change your target to (SA)
for CH please!!
A final word on hotkeys – some players like to embellish and that is fine as long as the capitalized command is first in the sentence. Most people are using their field of vision to look only briefly, thus the examples above are structured for easy recognition.
Complete Heal Rotations
The
idea of CHR is to force the healing on one target because for one Cleric it is
almost impossible to keep the main Tank alive (on High Level encounters) and
she/he will produce aggro and be summoned and killed, thus you try to split the
heals among the Clerics and Druids to reduce aggro and
make the mana cost more efficient. The CHR consists of a CH being cast and
second CH being cast after a designated wait time. There will be a casting order setup that you should follow
during a CHR that shows who’s turn it is to cast the CH. The CHR also must be started on incoming of the boss mob or
when the RL designates. It is very
important to follow the CHR list and be sure to cast the spell on time.
Gaps in the CHR can cause a tank to fall and subsequently all the clerics
unless the SA can gain agro quick enough.
All Clerics and Druids with their incomplete heal should join the EPHEAL channel and make all calls in this channel. Any other classes that we need in the channel will be announced as needed. Use alphabetical order to establish the casting sequence.
All Clerics and Druids with their incomplete heal should make a hot button like this one:
/cast #
/(channel)
casting CH on %t be ready!
/cast #
/pause
(number to be announce prior to engagement)
/(channel) <<<< (Cleric/Druid name capitalized) >>>>
CAST NOW
The macro heals your target and automatically notifies the next cleric it is his/her turn to CH the MA. In this macro we have added a pause before notifying the next cleric it is his/her turn to CH the MA. This pause can be varied according to the mobs you are fighting and the relative defensive strength of your tank. The above macro lets us achieve a standard CHR while limiting as many of the outside variables as possible.
Healers can use /rtarget or /tgb commands to target individuals or groups for buffing. For instance, a melee may send a tell to the enchanter asking for a haste. The enchanter in turn types /rtarget or /tar <charname> and casts.
Advanced tactics include hotkeys such as the following:
/rtarget
/stand
/(channel)
casting <spellname> on %t
/cast
<gem#>
/sit
/tgb
/stand
/(channel)
casting <spellname> on %t’s group
/cast
<gem#>
/sit
Puller
Pullers
should create an INC button that is easy to read and makes the mob quickly
identifiable:
/rs !!! INCOMING %t !!!
If multiple mobs are incoming simply hit your incoming message the appropriate number of times. This will let crowd control know they need to stand ready.
At no time should the puller train the camp. Make a hotkey that has the following 2 lines:
/loc
/(channel)
Trained! Stopping and dying. I have my LOC
Recovery of a single corpse is far easier than recovery of the entire pep rally party. Be kind to your fellow pep rallyers!
Do not heal the puller when they are incoming with a pull. In many cases the puller aggroed the mob he is incoming with either a thrown object or merely proximity aggro. This means that by the mere fact of healing even a small amount of health for them you have achieved a higher rating on the hate list than they have.
A simple rule of thumb is this: If you can’t see the puller, never, ever, cast a heal on them. Ask them if they are clear before you cast any heal on them. If you assume that every time you see a monk FD’d that it is ok to heal them then your going to cause quite a few trains. Typically a healer will be assigned to the puller, or the pull group, and they will indicate the appropriate time to heal. Simply put, the puller is doing everything that they can to get targets into camp and sometimes this will include the death of the puller. Before the puller begins his night he accepts this as truth and works from that outlook.
Many times we will put together an entire group that will be classified as the pull team. Generally this group will move a bit away from the main pep rally and start splitting mobs off to bring back the pep rally. If you look at this group like a highly contagious disease where any contact whatsoever with them can kill you then you’re on the right track. This group is an autonomously functioning group but attached to our pep rally.
Fighting Procedure/Positioning
The above is a step-by-step example of what will generally happen every fight. But, one of the key variables that we must cover in depth is the positioning a mob.
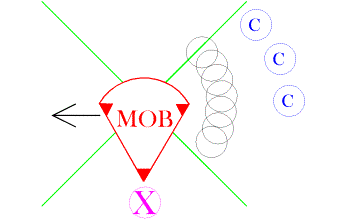
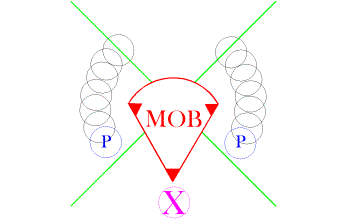
How do we keep a mob from moving? Well first let’s see how you cause a mob to move. The mob is pretty clear in the pictures below. The pink X is our MA, the black circles are our melee and the blue circles with C in them are casters.
If all of our melee and casters gather on one side of the mob, it will get pushed in the opposite direction. The above picture is an example of what we do not want to do.
Keeping mobs stationary is simply a function of supplied pressure. Each member or our pep rally, melee, caster, pets, will create some amount of push during a fight. Whether it’s a monk swinging amazingly fast or a caster nuking the mobs socks off, it all generates push. The only way to counter this is to equalize the pressure on the mob so that it remains stationary or to force the mob into a corner or against a wall.
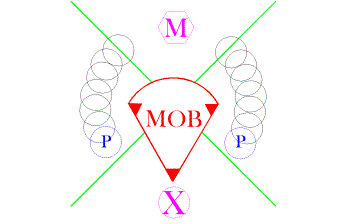
In order to understand the best ways to go about positioning a mob and arranging our pep rally around them it is helpful to understand some basics about Mob geography.
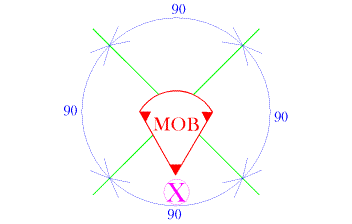
In the above picture you can see the Mob with the MA standing directly in front of him. We have dissected the area around the mob into 90 degree arcs in order to more easily explain not only how to position the Mob but also how we will be placing our pep rally members.
The front 90 degree arc belongs to the MA and to him alone. He owns it, he controls it, and everyone else must stay out of it or he will eat your nose off.
The other 90 degree sections are used differently depending on what type of pin we are applying to the Mob.
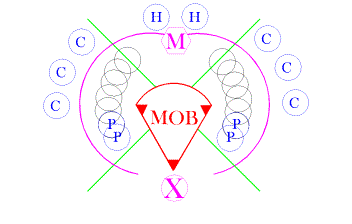
Some classes (plate classes: Warrior, SK, and Paladin) have higher AC than others (i.e. chain, leather, and silk classes). This means that they can avoid damage easier than others. A Warrior (a plate class) with 1300 AC will typically take less damage than a Ranger (a chain class) with 1000 AC getting hit by the same mob. As you know, your attacks are often riposted by high-level mobs, and too many ripostes can be just as deadly as too much aggro. Melees in the frontal arc will be riposted, but those in the sides or rear arcs will not be riposted. Since there is limited space around a mob, and since you don’t want to push the mob, you want to make sure that your plate classes are closest to the front arc and your chain and leather classes are further towards the back (since they would take more damage from ripostes than would chain classes). Remember, the MA should be as close to the mob as possible in order to gain extra aggro, and all others should attack from max melee range in order to get as little aggro as possible.
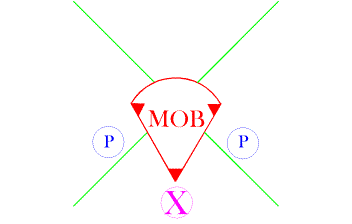
In the above picture you can see how we have placed plate wearing classes as close as we can to the MA’s territory without them actually stepping foot into his lands. The plate wearing classes are our anchors. They show us the closest we can get to the front of the Mob without getting into the MA’s territory
.
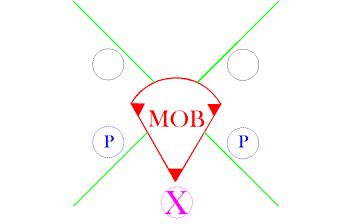
The black circles in the above picture represent where the leather classes should be to avoid any possible riposte damage.

We have applied ‘pressure’ or vector arrows to the above picture so that you can so how we should be balancing our push against each other.
Now that you have a basic understanding of push and how to counter it, we will discuss 3 different pins that we will be using as we are pep rallying.
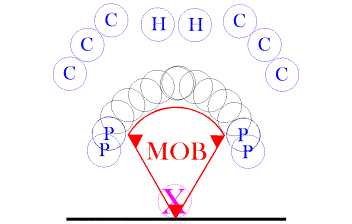
Our first pin we will affectionately call the Hot Plate Sandwich. This is an open pin that requires coordination and balancing from melee and casters.
.
In the above picture you can see that we have filled in the sides of the mob with melee characters with the plate classes to the front. The idea behind this pin is that both sides are pushing equally against each other and the mob will remain stationary.
Once we have filled in around the mob, everyone needs to remain in position and only move to balance out what someone else is doing on the other side. In a perfect world we would lock into this position and no one would have to move at all.
But our world is not perfect, so enter the Monk. ( It’s the large M in the hexagon above.) The Monk has free rein to run around the back and sides of the Mob to counter any push created by melee or casters. The Monk is our roving pusher and the only one that should be moving during fights. The pink lines in the picture below are the Monk’s playing field. We won’t always have extra Monks to roam around the mob and counter the push so please be aware of how each side balances against the other and make changes where appropriate.
As you can see, we have now added casters and healers to the mix. You can see that we have balanced the casters to both sides of the mob so that they can once again balance their push against each other.
We won’t always be able, or want to have the casters dashing out to either side of the mob for every single fight. There will always be variables such as AE or line of sight that we must consider in these situations. What is important to understand for casters is that many of your spells will create push and that push much be countered in some way.
The Hot Plate Sandwich, or Open Pin, is all about balance. You must always be aware of those characters and pets across from you and how they are effecting what you are doing.
In a way it’s like playing the mirror game. If you pick a partner across from you and mirror their every movement then the HPS will be a great success.
In some situations, our guild will not have enough of the right classes or will not be experienced enough to control the positioning of melees in a way such that our push will cancel each other out. If this is the case, there is another way to hold the mob still. The MA gets up against a wall and positions the mob directly in front of him. He builds aggro then calls for assist. When the assist call is made, every melee attacks the mob from the rear, pushing the mob against the wall, and against the MA. This keeps the mob immobilized without the necessity of surrounding it. This is especially useful against Cazic Thule and other mobs that knockback, since the warrior is against a wall and won’t be knocked backwards.
As you can see, the MA is flattened against the wall and the pep rally is arrayed behind the Mob and trying to push the Mob right down the MA’s throat. The plate classes are still in their positions and we have arrayed the casters behind the Mob and to the sides so that they can push equally.
Another pin that is very similar to the wall pin is a corner pin.

Once again you can see the plate classes on the corners with the rest of the melee arrayed in between them. The casters are arranged evenly in an arc behind the mob and everyone is trying to push the mob directly through the MA and into the corner.
We hope this clarifies what we are expecting when we call for these pins on Mobs.
In some instances it may be useful to push a mob, especially if the mob is a Cleric (like Lady Vox). In this instance you place your pep rally force behind the mob and use the push we have been talking about to make the mob move. The MA will walk slowly backwards as the pep rally pushes the Mob towards him. When you need to move the mob (i.e. to keep it from backing onto a wall and being able to cast), your MA or pep rally leader should call “switch sides” and everyone will move to the other side and being pushing the mob in the other direction.
Class
Notes
The
pep rally leader will communicate what is expected of each class during fights. This
may be communicated through the group leaders. This is done so that participants
will know what to expect from other classes and also to control aggro to
characters other than the MA or SA.
All Classes - USE ASSIST. Set up a hotkey to ensure you are targeting the same MoB.
/assist (MA)
The key to aggro control is know when to use your abilities and when not to. Remember that you are part of a team, and that not every ability or spell is appropriate in every, or even in most, situations. If you find the mobs ping-ponging when you nuke try to get close to the MOB before you nuke/slow/etc so if it does aggro you it won’t ping-pong and the MA can regain aggro easily.
ONLY use taunt when you are the main assist. It's that simple. If you find yourself getting hate when you're not the main assist, then stop attacking and back off slowly until the mob has been back on the main for a few seconds. Only the main assist should break mezzes. Examples of the required hotkeys are in the MAT section above. Have another hotkey about breaking mezzes, also covered above. Use this, and then attack the mob. Doing this will save your enchanter's life and your cleric's mana. (The enchanter may also be using memory erase spells.)
See warriors above for your rules on taunt. Refrain from flashing or stunning the mob unless you have to (example: The mob is healing/gating, etc). Remember that mobs really hate being stunned and blinded and WILL start hitting you, so be careful. Only root for crowd control and to keep a mob from running or force aggro. When you lay hands on someone, expect that mob to come after you with a vengeance. Also, if the Clerics are OOM or down have LoH hotkeyed as a last resort.
Don’t forget that you do have healing capability. You can throw small bridge heals that can keep a group member or the MA alive and also reduce downtime between fights.
If you find yourself getting aggro during the fight, stop attacking, cast Jolt, and back off. In open areas, back off and use your bow. Rangers do more damage with bows than any other class, so use it. In close quarters, like in dungeons, use your spells. Be careful of casting spells when in direct melee contact with the mob, you can easily increase your hate and cause the mob to ping-pong.
Make sure you are snaring mobs that will run. You can take a few more hits than a Druid and you also have aggro reducing capabilities such as jolt. You can snare mezzed mobs to reduce their speed before they go charging for the Enchanter.
Don’t forget that you do have healing capability. You can throw small bridge heals that can keep a group member or the MA alive and also reduce downtime between fights.
You can do great damage, but your main job is pulling. This is not a good class for those with a poor sense of direction. It’s important to know the zone and know how to pull it in order to do your job well. A good monk can mean the difference in your encounters. Monks are adept at CRs and single-pulling and splitting mobs. Your job is a very hard one for any other class to do.
A decently geared BL can easily put out as much DPS as a Monk. Be aware of your capabilities and also the downsides (aggro) that you can acquire from using those capabilities.
Don’t be afpep rally to battle rez if the pep rally leader tells you to. The newly rezzed person won’t be hitting for full damage, but may end up making the difference anyway…especially in longer fights.
You are crowd control for some encounters (kiting adds around so that they don’t hurt your guild), you are patch healers, you are buffers, and you are nukers. You are porters, evacers, etc.
You are great for buffing, DoTing, and patch healing. Throw heals on everyone that the Clerics are missing…remember, low health is a very big producer of aggro. Your most important job, however, is to slow the mobs. Without a high-level Shaman, many encounters simply aren’t possible.
After Rogues, guilds look to Wizards to do the real damage. Watch your aggro, know the mob’s resists, and use your most mana-efficient spells. Remember you can do a lot more damage in a long fight with your less powerful spells than you can in one fell manaburn. Use your spells wisely, and watch your aggro
The mod rods you make will reduce downtime and help the guild accomplish encounters they otherwise would be unable to do. CotH helps get latecomers to your camp quickly and easily and in some cases can be used in pulling situations.
Crowd control, buffing, runing, slowing, tashing…your class is also important. You are the primary method of controlling (mezzing) additional mobs that come into your camp when your guild is attacking something. Your buffs (haste, clarity), and your runes are very important. You are a back-up slower and your tash line of spells can save the day by making all the other casters useful…without tashes the other casters are just a waste of healing (no offense!).
Additional
Notes
For
most pep rallies, it is advised that you:
Many of these options can be found by hitting alt-o and looking for the settings there. For any of the slash commands simply type the command in again and replace off with on to toggle these options back on after the pep rally. Please feel free to experiment in finding the optimum settings that work for you.
It is also recommended that you experiment with creating new windows to filter your chats and your combat information into. There are many, many options that you can play with until you get the settings that are right for you.
These are some commands that your Pep Rally Leader may use:
ALL STOP!: This command is given when the pep rally or group is on the move and must stop immediately to renew an invis, let someone catch up or to deal with some other emergency.
ASSIST on <mob name>!: This command is often given by the MA (Main Assist) after they have selected their target to attack and built aggro. Main Assist keys should be setup before the pep rally begins.
ASSIST SECONDARY NOW!!: This command is given when the Main Assist goes down and the Secondary Assist is tanking. Secondary Assist keys should be setup before the pep rally begins.
CLERICS CAMP NOW!!: This command is given by the Pep Rally Leader in the event of an expected party wipeout. All clerics should immediately sit and camp in order to handle resurrections when the coast is clear and the order is given to return. Monks, Necromancers and Shadow Knights should prepare to feign death if the situation merits.
ENGAGING <mob name>: This is used by the MA to identify they have identified the pulled mob and are engaging it to build aggro. A call to assist will follow shortly.
EVAC!! or EVACUATE NOW!!: This command is given rarely on large pep rallies and never on Planes Pep Rallies. Wizards and Druids in groups should be instructed beforehand if this option is to even be considered and attempt to keep mana in reserve for this option. If this command is given, move as quickly as possible to the caster in your group who is evacuating so as not to be left behind.
EVERYONE CAMP NOW!!: This command is given by the Pep Rally Leader in the event of an expected train or party wipeout. All participants should immediately sit and camp to return only when instructed and the order is given to return. Monks, Necromancers and Shadow Knights should move out of AoE range if possible and feign death if this situation merits.
INC! or INCOMING <Mob Name>!: The Pep Rally Lure will use this command to indicate to the party (parties) that a mob is on its way.
MEZZING <Mob Name>!: Pep Rally Crowd Control will tell the channel which mobs are being mezzed or those on which the attempt is being made. Under NO circumstances will these mobs be attacked unless the MA or SA orders it.
MOVE OUT!: This command is given by the Pep Rally Leader when he or she determines that it is time to move to a secondary or tertiary position. Participants should ensure that they stay with their groups unless specified to do otherwise.
NUKE!!: Direct damage dealing casters generally should wait until a mob has taken enough damage before nuking, so as not to taunt it to them away from the MA or SA. In circumstances, where the MA is fighting a very large mob or sees the situation as dire, they may call for casters to start casting direct damage spells.
PETS UP NOW!!: Enchanters, Mages, Necromancers, Shaman, etc., should immediately summon their pets and not a second beforehand. Pets are often unpredictable and can cause problems and only the Pep Rally Leader should give this order.
KILL ALL PETS!!: This is self-explanatory and means one thing; Kill your pet immediately. This is not a problem as much as it used to be as the pets will no longer aggro mobs to groups just by being near a mob. However, be aware though that mobs that use AoE spells may catch a pet in it's range and cause problems so use the /pet sit down command.
TRAIN!: This means a large number of mobs are incoming and are usually too many for the group to handle. Certain death is usually imminent unless a camp, evac, or zone order is given by the Pep Rally Leader. It is the Pep Rally Leader's responsibility to make this decision. If the Puller has initiated the TRAIN then the puller use the hotkey stating he or she is stopping and dying while also recording LOC. Never train the camp intentionally. Never wander away and create a train.
ZONE!: All pep rally participants should race immediately to the zone.
All participants of an Elusive Path Guild Pep Rally are expected to have read and to have agreed to the Loot Policies by signing up. A separate loot section will be posted for all to view however we do have a few simple rules that will be constant.
Epic
Items
Items
needed to complete an Epic Quest will be awarded to the participant that is
furthest along with their quest. This should be apparent before the pep rally begins
and easy to distinguish. However, in the event that two participants are at the
same point - they will roll for the item. The Pep Rally Leader or Master Looter will
be the final determining authority as to the disposition of any item otherwise.
Cash
& Gems
Unless
otherwise stated in the Pep Rally Announcement, all cash and gems will be held by the
guild bank. Individuals are not expected to carry the cost burden for pep rallies
and
as such the bank must receive an influx of funds.
Auctioning
Pep Rally Items for Profit
While
there is no way to ensure that items won on a Pep Rally won't be sold for profit it
is policy that doing so may prevent a member from participating in future pep rallies.
Non-Guild
Participants
Non-Guild
Pep Rally Participants in an official pep rally will be treated equally and without
prejudice as any other participant according to the Pep Rally Loot Policies.
Alternate
Character (Optional Rule)
In the
event that a Pep Rally Participant wishes to bring a certain character, but another
character has been requested by the Pep Rally Leader, then they may assign their loot
to the character that they wanted to bring. Under most circumstances, this will
not be allowed and is not encouraged however there are special circumstances and
requirements in which case a Pep Rally Leader may approve it. This must be firmly
established and understood before the pep rally begins.
The Pep Rally Participant's primary character on the pep rally is needed more and is of better use to the overall pep rally than the secondary character they are requesting to bring.
The Pep Rally Participant's primary character agrees that they will not loot any items unless they are for their secondary character. Stated simply, the primary is not entitled to any loot unless it is for the secondary.
The Pep Rally Participant is responsible to have the secondary character in place before the pep rally and able to loot no-drops in a timely fashion.
The Master Looter will announce to the pep rally the intention of the primary character to loot for their secondary character before the pep rally begins.
No, this doesn’t mean to go up in levels. This means get into dungeons and hunt. You can go from level 1 all the way to 65 without ever setting foot in a dungeon and this is truly a grave disservice to you in the long run. There is not an outside zone in the game where you can’t scatter like bunnies and some of you will make it out alive. If you bring that experience into upper level pep rallies then you are very likely to get a lot of people killed and suddenly find yourself in tell hell. Fighting in dungeons teaches you to move as a unit, to stick together in tight little ball to avoid aggro. It teaches patience and many, many other skills that you will never learn outside and we encourage everyone to get in there and learn.
Many of you may say that you can never find groups in dungeons. Well, we have a simple answer to that. Bring your own group. Go hit a web site and find out the goodies that drop in there and let folks know what they are. You may be quite surprised at how many folks want to go join you in your spelunking.
The other experience you need to get is full group hunting, partial groups, and soloing. Do them all. Learn what you can bring to the table as well as what others bring. You don’t have to know every single skill other classes have, you just have to know how your job changes with them in the group.
One thing that I have found out in my time running around Norrath is that a lot of folks don’t really know their characters true potential. You see folks saying that only Warriors can be tanks, or that you have to always have an Enchanter or a Cleric in your group. That’s tunnel vision folks, and it will limit you to the standard paths in the game.
Experiment. Read guides that folks put out for solo hunting and duoing for your class. Be willing to trying something new or dangerous. I can’t tell you how many times I have done things as a duo that you usually only see full groups do. Work smart, not hard. Be patient. Watch and learn from others and you will find that by doing these things you will bring a lot more to the table when you go on pep rallies and you might just be the difference between success and failure.
Have fun!!!
If
you're not having
fun doing this, then we're doing something wrong. Lets get some feedback,
suggestions, and Monday morning quarterbacking going. The next day, after the pep rally
is over and the experience has set in is perfect. By looking at what we did
right and wrong we can learn and move onward and upward.
Pep Rallying is about moving forward as a guild but it’s also about taking on the environment and walking out with smiles on our faces and a few toys that we couldn’t have gotten alone.
DISCLAIMER – Material for this document was researched from many sources. At the time references were not recorded. If upon viewing you find material adapted from your work please notify me at klaraven@aol.com and I will place an appropriate credit. This material is not intended for resale in any manner.
Thanks to Zepphia for all the additions and proofing.
Thanks to all of our officers for their feedback.
Thanks to Jazun and Eckko for their quite voluminous contributions.